Plans - AI-Powered Multi-Step Workflows
이 콘텐츠는 아직 번역되지 않았습니다.
Plans are multi-step AI workflows that break complex tasks into a sequence of focused prompts, each building on the last. Instead of cramming everything into a single message and hoping the AI holds it all together, a Plan divides the work into discrete, purposeful steps that run automatically in order (or in parallel), passing results forward as context.
This matters because many real-world tasks genuinely cannot be solved well in a single step. Effective reasoning often requires stages: gather information before drawing conclusions, outline before drafting, critique before finalising. A single prompt collapses all of that into one shot and the output quality suffers. Multi-step workflows mirror how experts actually think: research first, then analyse, then decide, then write.
Plans also enable decision-making that spans multiple concerns. A job application plan, for instance, needs to understand the role, match it against a CV, and only then write a tailored cover letter. These are three distinct reasoning tasks where each step genuinely depends on the previous one. Doing all three at once produces generic output; doing them in sequence produces something precise and considered.
Use Plans for anything that benefits from structured, multi-stage reasoning: research reports, blog posts, competitor analysis, job applications, meeting notes, and more.
How Plans Work
Section titled “How Plans Work”A plan is made up of three parts: inputs, steps, and an optional workflow.
Inputs are the values you provide before running a plan - things like a topic, a tone, or a URL. They are referenced inside step prompts using {{key}} placeholders and stay constant throughout the run.
Steps are the core of a plan. Each step is an independent prompt sent to the AI with its own goal. Steps run in a defined order and each one can reference the outputs of any earlier step, also via {{stepId}} placeholders. This is what creates the chain: the result of one step becomes the raw material for the next.
Ask steps are a special kind of step that pauses the plan mid-run and asks you a question. Instead of declaring everything up front in the input form, ask steps let the plan gather information dynamically — for example, asking a clarifying question after an initial research step has run. Your answer is injected into scope just like any other input, so later steps can reference it with {{stepId}}.
Workflow controls the execution order. By default, steps run sequentially from top to bottom. For more advanced scenarios, you can define a workflow block to run steps in parallel or add conditional branching based on input values.
When a plan runs, Askimo executes each step in order, collects the outputs, and presents the final step’s result. No manual copy-pasting between prompts is needed.
flowchart TD
    I([User provides inputs]) --> S1[Step 1]
    S1 -->|output passed automatically| A1{Ask Step\npauses for input}
    A1 -->|user answer stored in scope| S2[Step 2]
    S2 -->|output passed automatically| S3[Step 3]
    S3 --> R([Final result shown in Plans view])

    I -.->|inputs available to all steps| S2
    I -.->|inputs available to all steps| S3
Running a Plan
Section titled “Running a Plan”Finding the Plans View
Section titled “Finding the Plans View”Plans live in the Plans section of the main navigation sidebar. Click Plans to open the gallery.
Selecting and Running a Plan
Section titled “Selecting and Running a Plan”- Open the Plans view from the sidebar.
- Browse the gallery and click on a plan card to open it.
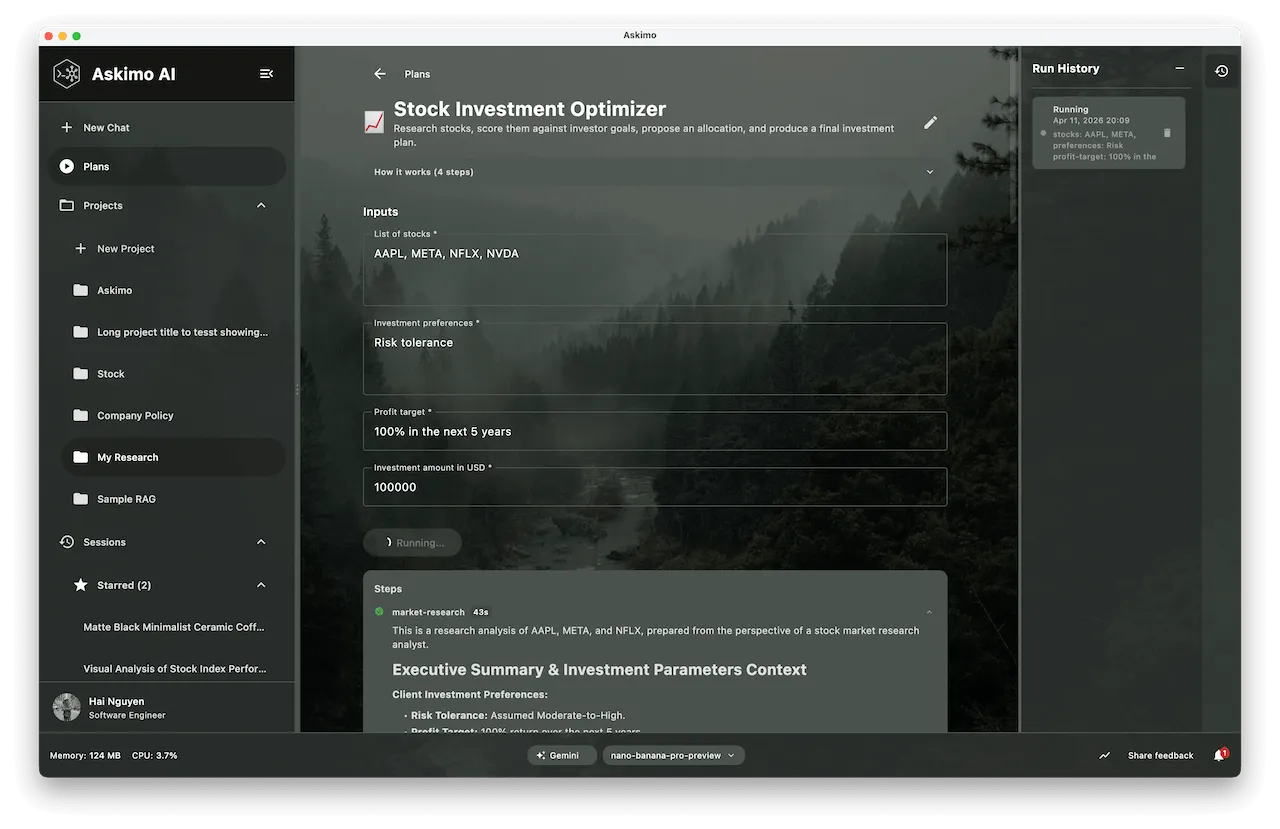
- The detail view shows the plan’s description, step count, and input fields.
- Fill in all required inputs (marked with
*). Optional fields can be left blank. - Click Run Plan.
The plan executes each step sequentially. You can watch progress as each step completes - a step indicator shows which step is currently running and how long it has taken.
If the plan contains ask steps, execution pauses at each one and an inline question panel appears directly below the step progress. Type your answer and press Enter (or click the send button) to resume. If you have nothing to add, click Skip to continue with a blank answer.
Following Up on a Result
Section titled “Following Up on a Result”Once a plan finishes you can refine or extend the result without re-running the full workflow:
- Read the result in the output panel.
- Type a follow-up instruction in the Follow-up text field at the bottom of the result.
- Press Enter (or click the send button) to submit.
The follow-up sends the full prior result as context along with your new instruction. The result is updated in place. You can follow up as many times as you like.
Example follow-ups:
- “Make the executive summary shorter”
- “Translate the output to French”
- “Add a section on risks and mitigation”
- “Make the tone more formal”
Run History
Section titled “Run History”Every plan run is saved automatically. Click the History icon (or expand the history panel) to see previous runs for the same plan. You can:
- View any past result.
- Restore inputs from a past run to re-run with the same values.
- Delete individual runs.
Exporting Results
Section titled “Exporting Results”The plan result can be exported in multiple formats. Click the Export button in the result panel:
| Format | Use case |
|---|---|
| Share the result as a portable document | |
| Word (.docx) | Edit the result in Microsoft Word or compatible editors |
Two export modes are available:
- Export Result - exports the final output only.
- Export Full Run - exports all step outputs in sequence, useful for auditing or review.
Built-in Plans
Section titled “Built-in Plans”Askimo ships with ready-to-use plans covering common tasks:
| Plan | Steps | Description |
|---|---|---|
| Blog Post Writer ✍️ | 4 | Outline → draft → SEO review → final polished post |
| Email Writer 📧 | 2 | Draft → reviewed and improved email |
| Plan | Steps | Description |
|---|---|---|
| Research Report 📝 | 2 | Research a topic → write a structured report |
| Competitor Analysis 🏆 | 4 | Profile → comparison → opportunities → full report |
| Plan | Steps | Description |
|---|---|---|
| Meeting Notes Processor 📋 | 4 | Structure → action items → summary → final minutes |
| Job Application Writer 💼 | 5 | Job analysis → CV match → cover letter → CV tips → tailored résumé |
Built-in plans are read-only. To customise one, use Duplicate & Edit (see below).
Creating Your Own Plans
Section titled “Creating Your Own Plans”You can create completely custom plans from the Plans gallery. There are two ways to do it:
Option A - AI Generation (Recommended)
Section titled “Option A - AI Generation (Recommended)”Describe your workflow in plain English and let the AI write the YAML for you.
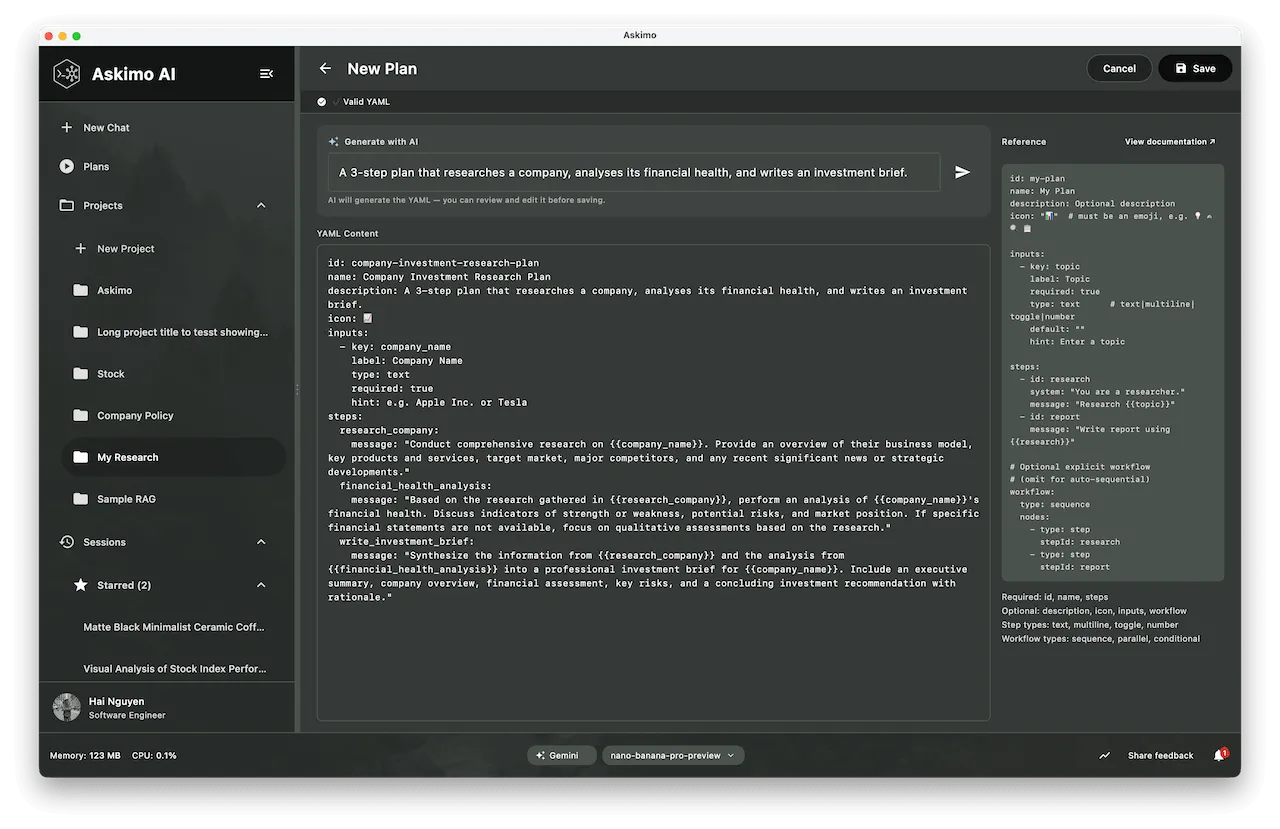
- Click the + button in the Plans gallery to open the New Plan editor.
- In the ✨ Generate with AI panel at the top, describe what you want. For example:
“A 3-step plan that researches a company, analyses its financial health, and writes an investment brief.” - Press ⌘ Enter (macOS) or Ctrl + Enter (Windows/Linux), or click the send button.
- The AI generates valid plan YAML and places it in the editor below.
- Review the YAML, make any tweaks, and click Save when ready.
Option B - Write YAML Directly
Section titled “Option B - Write YAML Directly”For full control, write the YAML yourself in the editor. A live reference panel on the right shows the schema and an example. A View Docs link takes you to this page.
Click + in the Plans gallery, leave the AI panel empty, and type or paste your YAML directly into the editor.
Duplicate & Edit a Built-in Plan
Section titled “Duplicate & Edit a Built-in Plan”- Hover over a built-in plan card in the gallery.
- Click the ⋮ menu and select Duplicate & Edit.
- The editor opens pre-filled with the built-in’s YAML (the id is suffixed with
-copyto avoid shadowing the original). - Modify as needed and click Save.
Plan YAML Reference
Section titled “Plan YAML Reference”Plans are defined in YAML files stored in ~/.askimo/<profile>/plans/. The schema is straightforward:
Top-level Fields
Section titled “Top-level Fields”| Field | Required | Description |
|---|---|---|
id | ✅ | Unique kebab-case identifier (also the file name) |
name | ✅ | Human-readable display name shown in the gallery |
icon | - | A single emoji (e.g. "📊") shown on the plan card |
description | - | Short description shown in the gallery card |
inputs | - | List of user-facing input fields |
steps | ✅ | List or map of step definitions |
workflow | - | Explicit execution topology (omit for auto-sequential) |
Inputs
Section titled “Inputs”Each input defines a field the user fills in before running the plan.
inputs: - key: topic # referenced in steps as {{topic}} label: Topic # caption shown in the UI type: text # text | multiline | toggle | number required: true # plan will not run if blank default: "" # pre-filled value hint: Enter a topic # placeholder / helper textInput types:
| Type | UI control |
|---|---|
text | Single-line text field |
multiline | Multi-line text area |
toggle | On/Off switch (value is "true" or "false") |
number | Numeric input |
Steps can be declared two ways - both are valid:
List style (simple and most common):
steps: - id: research system: "You are a thorough researcher." message: "Research {{topic}} and summarise key findings." - id: report message: "Write a structured report. Research: {{research}}"Map style (useful when combined with an explicit workflow block):
steps: research: system: "You are a thorough researcher." message: "Research {{topic}} and summarise key findings." report: message: "Write a structured report. Research: {{research}}"Step fields:
| Field | Required | Description |
|---|---|---|
id | ✅ (list style) | Step identifier — used to reference output as {{id}} |
message | ✅ (AI steps) | The user prompt sent to the AI. Supports {{variable}} references |
system | — | Optional system prompt for this step |
ask | — | Interactive question shown to the user at runtime. When present, no AI call is made — the user’s answer is stored in scope under the step’s id |
Ask Steps — Dynamic Mid-Run Inputs
Section titled “Ask Steps — Dynamic Mid-Run Inputs”Ask steps let a plan gather information that can only be known after earlier steps have run. Unlike the static input form shown before a plan starts, ask steps pause execution at a specific point and present a question inline.
Example — a research plan that asks for a focus area after the initial overview:
id: deep-researchname: Deep Researchicon: "🔬"
inputs:  - key: topic    label: Topic    type: text    required: true
steps:  overview:    message: "Give a broad overview of {{topic}}."  clarify_focus:    ask: "Based on the overview, what specific angle or aspect should we focus on?"  deep_dive:    message: |      Write a detailed analysis of {{topic}}.      Focus specifically on: {{clarify_focus}}      Overview context: {{overview}}
workflow:  type: sequence  nodes:    - type: step      stepId: overview    - type: ask      stepId: clarify_focus    - type: step      stepId: deep_dive
When this plan runs:
- The
overviewAI step runs automatically. - Execution pauses at
clarify_focus— a question panel appears in the UI. - You type your answer and submit.
- The
deep_divestep runs with{{clarify_focus}}resolved to your answer.
You can chain as many ask steps as needed throughout the workflow.
Referencing Outputs
Section titled “Referencing Outputs”Use {{stepId}} in a step’s message to inject a prior step’s output:
steps: - id: research message: "Research {{topic}}." - id: report message: "Write a report using this research: {{research}}" # ↑ injects research step's outputYou can also reference user inputs directly:
message: "Write a post about {{topic}} for {{audience}}."Workflow (Optional)
Section titled “Workflow (Optional)”Omit the workflow block for simple sequential plans - steps run top-to-bottom automatically.
Add a workflow block when you need parallel execution or conditional branching:
workflow: type: sequence nodes: - type: step stepId: assess - type: parallel # runs itinerary + flights at the same time outputKey: research nodes: - type: step stepId: itinerary - type: conditional # only runs if user toggled "include flights" condition: "include_flights == true" node: type: step stepId: flights - type: step stepId: summaryWorkflow node types:
| Type | Description |
|---|---|
step | Runs a single AI step. Requires stepId. |
ask | Pauses execution and presents a question to the user. Requires stepId (must match a step with an ask field). The answer is stored in scope under the step’s id. |
sequence | Runs child nodes one after another. |
parallel | Runs all child nodes concurrently. Requires outputKey. |
conditional | Runs its child node only when condition is true. |
Condition syntax (evaluated against input values and prior step outputs):
| Expression | Example | Matches when |
|---|---|---|
key == value | "tone == formal" | Input or output equals exact value |
key == true | "include_flights == true" | Toggle is on |
key contains text | "topic contains AI" | Value contains substring |
Complete Example
Section titled “Complete Example”A simple two-step blog post plan:
id: quick-blog-postname: Quick Blog Postdescription: Research a topic and write a blog post draft.icon: "✍️"
inputs:  - key: topic    label: Topic    type: text    required: true    hint: e.g. "Benefits of remote work"  - key: audience    label: Target Audience    type: text    required: false    hint: e.g. "software developers"
steps:  - id: research    system: "You are a knowledgeable researcher."    message: "Research the topic '{{topic}}' for an audience of {{audience}}. Provide key insights, statistics, and talking points."
  - id: draft    message: "Write a 600-word blog post about '{{topic}}' for {{audience}} based on this research:\n\n{{research}}\n\nUse an engaging introduction, 3 main sections, and a strong conclusion."
Managing Your Plans
Section titled “Managing Your Plans”Editing a Plan
Section titled “Editing a Plan”- Hover over a plan card in the gallery.
- Click the ⋮ menu and select Edit YAML.
- Modify the YAML in the editor and click Save.
Deleting a Plan
Section titled “Deleting a Plan”- Hover over a plan card in the gallery.
- Click the ⋮ menu and select Delete.
- Confirm the deletion.
Built-in plans cannot be deleted - only user-created plans can be removed.
Where Plans Are Stored
Section titled “Where Plans Are Stored”User plans are saved as .yml files in:
~/.askimo/<profile>/plans/You can back them up, version-control them with Git, or share them with teammates by copying the YAML files.
Tips and Best Practices
Section titled “Tips and Best Practices”Keep steps focused. Each step should do one thing well. A step that tries to research, write, and review all at once usually produces lower quality than three dedicated steps.
Use the system prompt for persona. Setting a system prompt on a step that requires expert knowledge (e.g. "You are a senior financial analyst") often improves output quality significantly.
Reference earlier steps sparingly. Only inject the previous step output when the next step genuinely needs it. Overloading a step’s context with all prior outputs can dilute focus.
Wrap all message values in double quotes. YAML treats colons and special characters in unquoted strings as syntax. Always quote message and system values:
message: "Research {{topic}}: include recent trends." # ✅ safemessage: Research {{topic}}: include recent trends. # ❌ YAML parse errorUse AI generation as a starting point. The AI-generated YAML is often 80–90% correct. Use it as a scaffold and refine the step messages for your specific needs.
Troubleshooting
Section titled “Troubleshooting””Value for the variable ’…’ is missing”
Section titled “”Value for the variable ’…’ is missing””A required input was left blank. Fill in all fields marked with * before running the plan.
”Invalid YAML: mapping values are not allowed here”
Section titled “”Invalid YAML: mapping values are not allowed here””A message or system value contains a colon (:) without being quoted. Wrap the value in double quotes and escape any " inside with \":
# ❌ Causes parse errormessage: Research {{topic}}: include key metrics.
# ✅ Correctmessage: "Research {{topic}}: include key metrics."
Plan produces blank output
Section titled “Plan produces blank output”- Check that the last step’s
messageasks the AI to produce the final deliverable explicitly. - Ensure that step references like
{{research}}match the exactidof the referenced step (case-sensitive).
Steps run but the result is empty
Section titled “Steps run but the result is empty”Verify the id fields in list-style steps are present and unique. If using map-style steps, the map key is the id - no separate id field is needed.
Ask step times out or the plan continues with a blank answer
Section titled “Ask step times out or the plan continues with a blank answer”If you do not respond to an ask step within 10 minutes, the plan resumes automatically with an empty string for that answer. You can click Skip intentionally to continue without answering. If the downstream steps rely on that answer, consider adding a fallback in the step message — for example:
message: "Write a report on {{topic}}. Focus: {{clarify_focus:-general overview}}"Learn More
Section titled “Learn More”- Skills - AI Agents for Your Workspace - when your task needs to read or write local files, run shell commands, or work inside a project directory, use Skills instead
- AI Investment Research Plan (example) - Real-world walkthrough of a multi-step AI Plan with RAG and MCP tools
- Askimo Features: AI Plans section - Visual overview of Plans in the desktop app