Your AI assistant is only as useful as the information it can access. By default, every model (Claude, GPT, Gemini, or a local Ollama model) is frozen in time. It cannot check today’s prices, read your files, or query your database. It can only work with what it learned during training.
MCP (Model Context Protocol) fixes that.
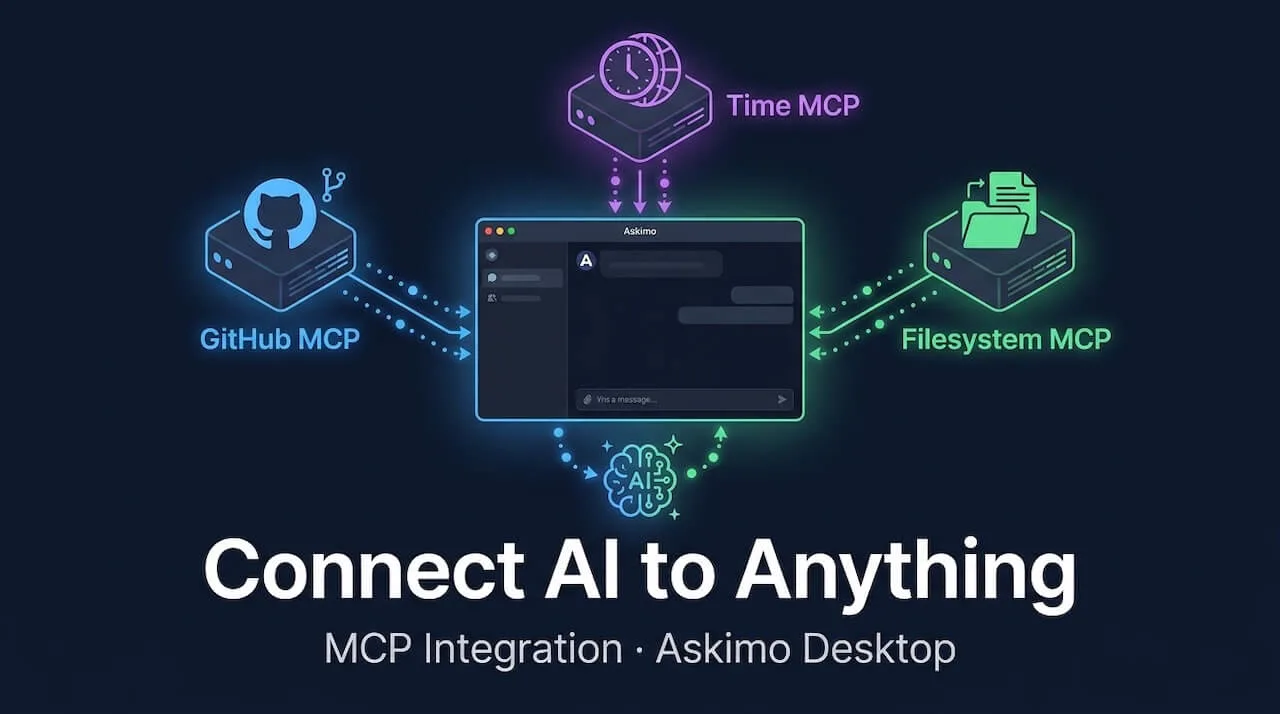
With MCP enabled in Askimo Desktop, your AI can connect to live data sources and take real actions: read files on your computer, browse your GitHub repos, query a database, search the web, and more. All from the same chat window you already use.
Quick start: Go to Settings → MCP Servers, click Add MCP Server, choose HTTP transport, paste in
https://api.githubcopilot.com/mcp/as the URL, addAuthorization=Bearer <your-token>as a header, click Test Connection, and save.
What MCP Actually Does
Think of MCP as giving your AI a set of hands.
Without MCP, the AI can only tell you what it knows. With MCP, it can do things on your behalf. Ask “What time is it in Tokyo right now?” and instead of guessing, it calls a live time tool. Ask “Show me my open pull requests” and it connects to GitHub and fetches the real list. Ask “What does my latest log file say?” and it reads it directly from your machine.
The AI still does all the thinking. It decides which tools to use, interprets the results, and writes a clear answer. MCP just gives it the ability to reach out and get real information when it needs it.
graph TD
    I1[MCP Instance\ne.g. GitHub]
    I2[MCP Instance\ne.g. Time Server]
    I3[MCP Instance\ne.g. Local Files]

    I1 --> S1[MCP Server]
    I2 --> S2[MCP Server]
    I3 --> S3[MCP Server]

    S1 & S2 & S3 -->|tools| AI[Askimo AI]
You can connect as many MCP servers as you want. Askimo manages the connections and makes all their tools available during your conversation.
What You Can Do With MCP
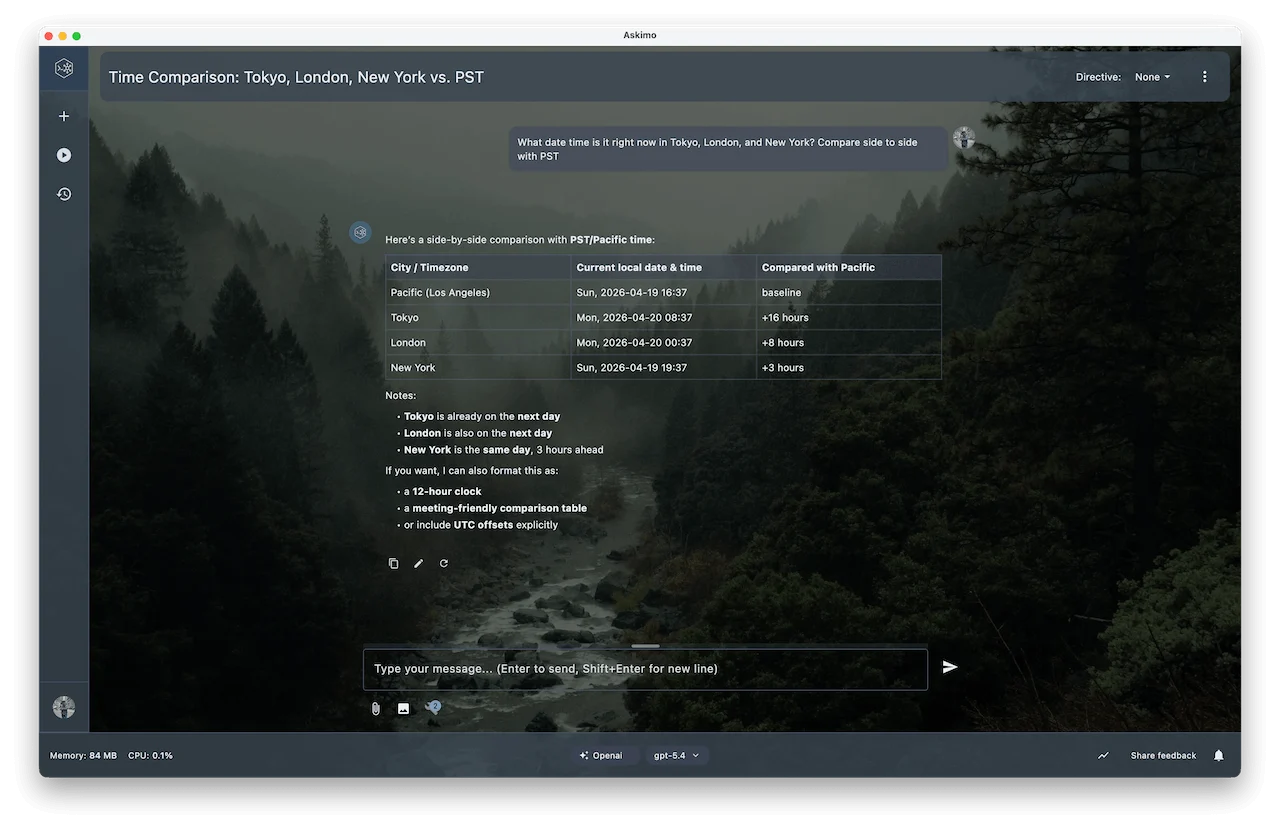
Get Live Time Across Time Zones
Connect the Time MCP server and ask questions like “What time is it in Tokyo right now?” or “Convert 3 PM EST to JST”:
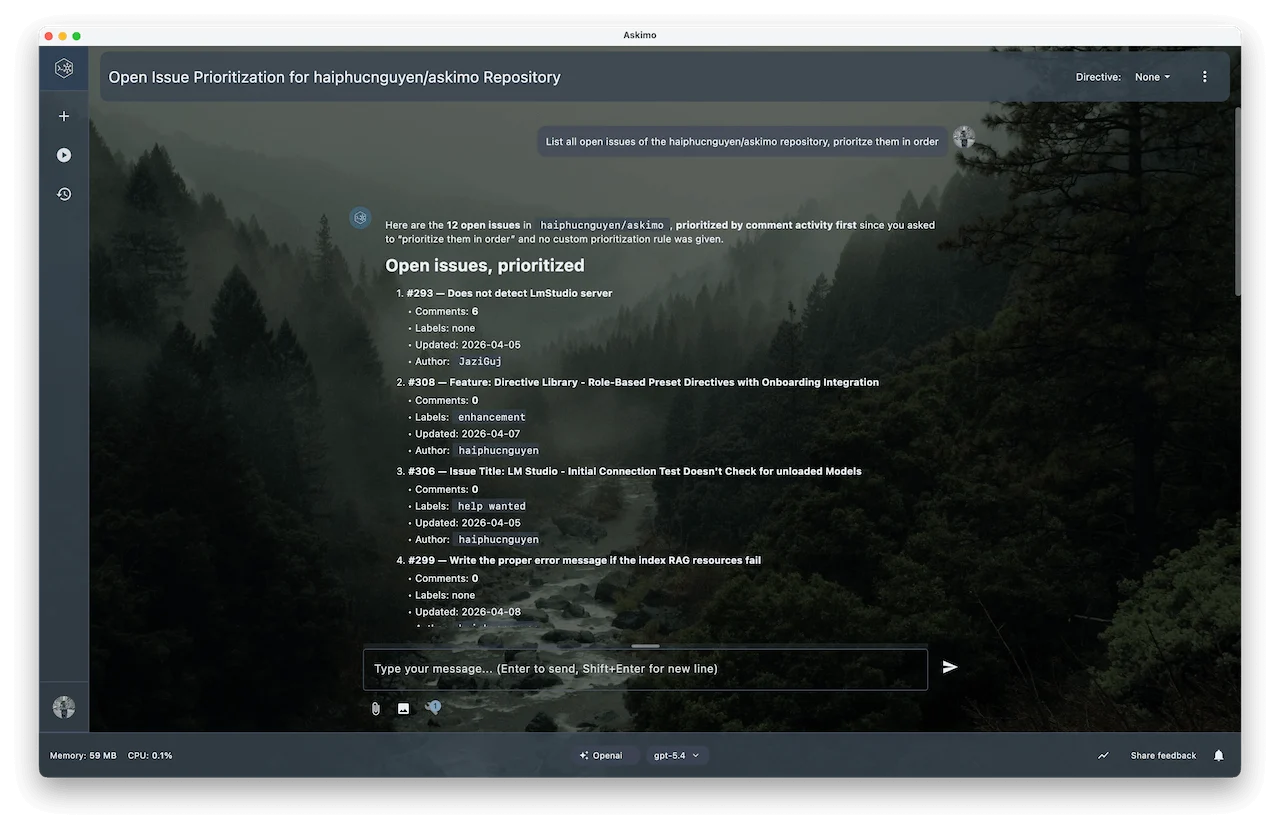
Browse and Act on GitHub
Connect GitHub MCP and let the AI list pull requests, summarise issues, search code, or create new issues on your behalf:
Read and Write Local Files
Point a filesystem MCP server at a folder and the AI can read meeting notes, summarise documents, or create new files directly on your machine. No copy-paste needed.
Search the Web in Real Time
Connect a web search server (Brave Search, Tavily, etc.) and the AI can pull current news, look up recent releases, or fact-check claims with live results.
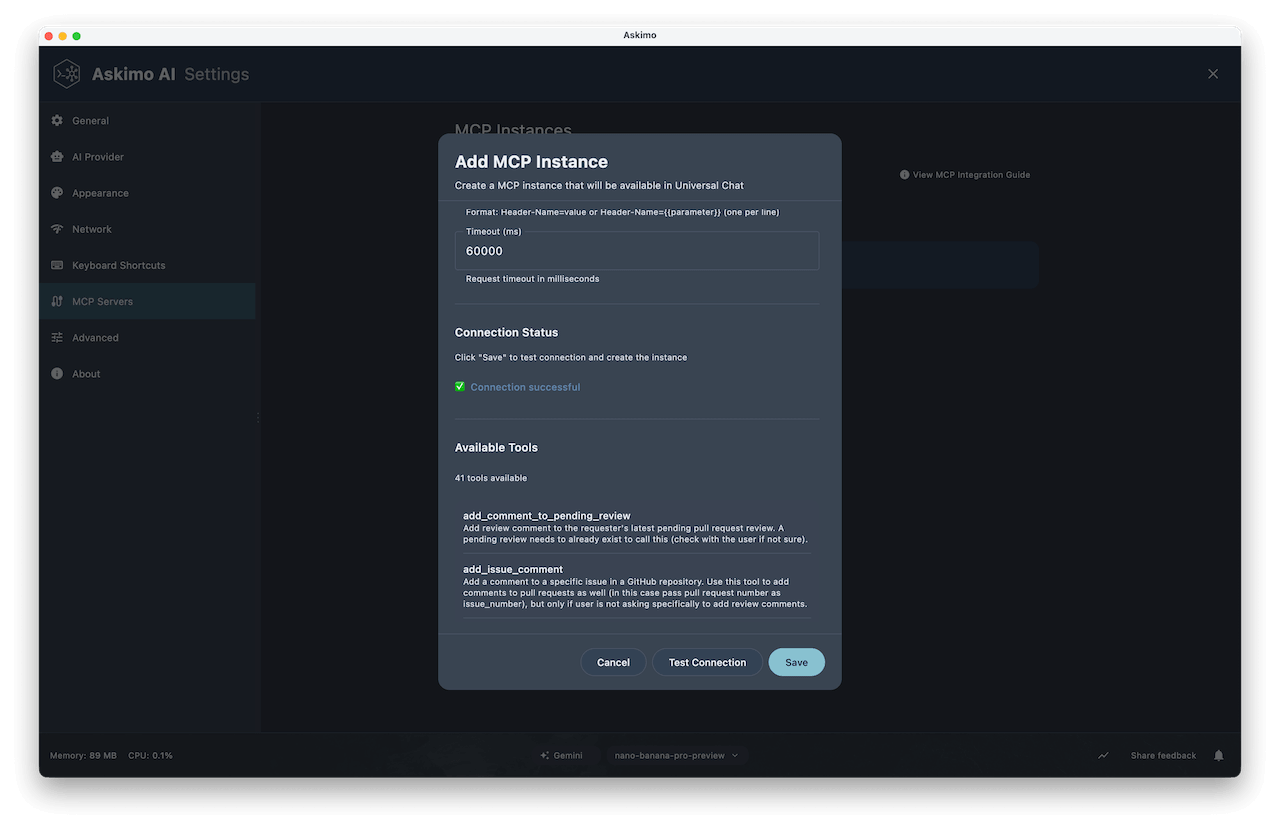
Setting Up Your First MCP Server
- Open Settings (
⌘ ,on macOS,Ctrl ,on Windows/Linux). - Go to MCP Servers and click Add MCP Server.
- Give it a name, choose your transport (Stdio or HTTP), and fill in the details.
- Click Test Connection to verify it works.
- Click Save.
That’s it. The AI will start using those tools automatically in any conversation where they’re enabled.
Stdio vs HTTP: Which One to Use
Stdio (Local Process)
Askimo launches a local process and talks to it over stdin/stdout. Use this for servers you install via npx or uvx.
| Field | Description | Example |
|---|---|---|
| Command | Executable to run | uvx mcp-server-time |
| Working Directory | Where the process starts | /home/user/projects |
| Environment Variables | Passed to the process | GITHUB_TOKEN=ghp_... |
Tip: Verify the tool is installed first. Run
npx --versionoruvx --versionin a terminal before testing.
HTTP (Remote Endpoint)
Askimo connects to a hosted MCP server over HTTPS. Use this for managed services like the GitHub Copilot MCP API.
| Field | Description | Example |
|---|---|---|
| URL | Full MCP endpoint URL | https://api.githubcopilot.com/mcp/ |
| Headers | Authentication headers | Authorization=Bearer mytoken |
| Timeout (ms) | Request timeout | 60000 |
Tip: Always use HTTPS when passing authentication headers.
Example: GitHub via HTTP MCP
Step 1: Get a GitHub Personal Access Token
Go to github.com/settings/tokens and generate a token with the scopes you need (repo, read:user, etc.).
Step 2: Add the MCP Instance
- Name:
GitHub - Transport: HTTP
- URL:
https://api.githubcopilot.com/mcp/ - Headers:
Authorization=Bearer ghp_your_token_here
Step 3: Test and Save
Click Test Connection. You’ll see tools like list_repos, get_pull_request, create_issue, and search_code. Click Save and start using them in chat.
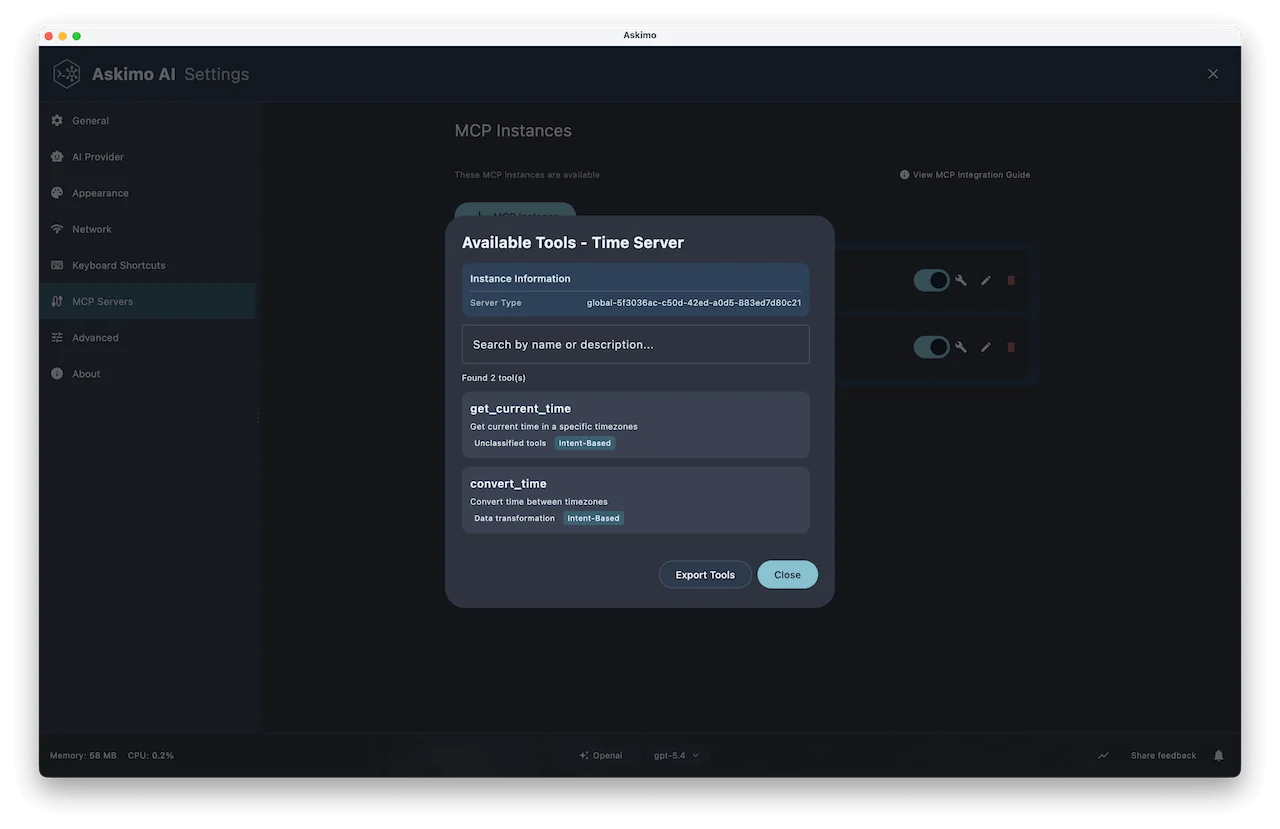
Example: Time Server via Stdio
Step 1: Add the MCP Instance
- Name:
Time - Transport: Stdio
- Command:
uvx mcp-server-time
No API key needed. It uses your system clock.
Step 2: Test and Save
Click Test Connection. You’ll see tools like get_current_time and convert_time. Save and you’re done.
Popular MCP Servers to Try
There are hundreds of MCP servers available for databases, APIs, browsers, productivity tools, and more. Good places to start:
- modelcontextprotocol.io — the official MCP registry
- mcp.so — community-curated directory with search and categories
- GitHub: awesome-mcp-servers — a curated list maintained by the community
Your Credentials Stay Safe
Askimo automatically detects sensitive values by name. Anything with key, secret, token, password, or credential in the name is treated as a secret:
- Never written to disk in plain text.
- Stored in your OS keychain (Keychain Access on macOS, Credential Manager on Windows).
- Loaded at runtime, so your config files stay clean.
Note: Keychain entries are not removed when you delete an MCP instance. Remove them manually via your OS keychain if needed.
Controlling Tools Per Conversation
Once MCP servers are connected, you control which tools are active via the Tools button in the chat input bar.
- MCP tools are enabled by default. The AI uses them when relevant.
- Built-in Askimo tools are off by default. Turn them on when you want both.
Tool settings apply only to the current conversation, not globally.
Managing Your MCP Servers
In Settings → MCP Servers you can view, enable/disable, edit, and delete any instance. Disabling keeps the config, which is useful for servers you only need occasionally.
MCP With Local AI (Ollama)
MCP works with local models too. If you’re running Llama, Mistral, or Phi via Ollama, the setup is identical. Your AI will use the same MCP tools entirely on your machine, with no data leaving it.
This makes fully private, tool-augmented AI workflows possible: query a local SQLite database, read files, and get answers from a local model, all offline.
New to Ollama? See: Askimo with Ollama: The Best Desktop for Local AI
Troubleshooting
“Failed to connect to MCP server”
- For Stdio: verify the binary is installed (
npx --versionoruvx --version). - For HTTP: confirm the server is running and the URL is reachable.
Tools list is empty after connecting
- Authentication is likely failing. Double-check your token or API key, then retest.
AI isn’t using MCP tools
- Check the Tools selector in the chat bar and make sure the server is toggled on.
- Some smaller local models handle tool use less reliably than Claude or GPT.
What MCP Makes Possible
With MCP, your AI stops being a static reference and becomes a genuine collaborator:
- Engineers: Query live databases, inspect GitHub, read logs, and run commands in one conversation.
- Researchers: Pull current web results and search local documents without switching apps.
- Writers: Read and update project files, keep long documents consistent, search notes.
- Analysts: Ask databases questions in plain English, pull live data, and export results.
Works with any provider: Claude, GPT, Gemini, or a fully local Ollama model.
Learn More
- MCP Integration Documentation: Full reference for all options
- Chat With Your Documents (RAG): Combine file indexing with MCP tools
- AI Investment Research Plan: Multi-step Plans that use MCP together
- Ollama Provider Setup: Configure local AI with MCP
Try Askimo today: 👉 https://askimo.chat
Star on GitHub: 👉 https://github.com/haiphucnguyen/askimo
Questions or feedback? Open an issue or join the discussions on GitHub. We’d love to hear what MCP servers you’re connecting.